Tuesday, December 18, 2018

Rollback Harmony firmware if your Harmony stops responding to your home automation.

Seems Harmony Hub FW 4.15.206 has a bug in it that cause the the hub to no longer respond to API requests. The simplest way to fit this it to roll back the firmware. Here are the steps that work from a  reddit post.

  1. Launch MyHarmony app on PC.
  2. Press Alt+F9 to open the advanced tools menu
  3. Scroll the window to find your Harmony model.
  4. Select "Factory Reset" for the appropriate model. This does not do anything immediately.
  5. Steps 1-4 will be displayed for completing a Factory Reset. We are only doing Step 1. "Restore" here means "Rollback".
  6. Connect your Harmony hub to the PC via micro-USB.
  7. Within a few minutes, it will be detected by MyHarmony and display Remote Model, Firmware Version, and Hardware revision. The Restore button will be enabled.
  8. Click "Restore" and wait. (Now is the first time that it actually describes that it's a rollback!)
  9. When it completes, you should be on Firmware Version 4.15.193. Disconnect the hub from the PC and return it to its original location.

You might want to block WAN traffic to and from your Harmony hubs till an update it posted.

Update:12/19

Next morning my main remote was not talking to the matching hub. Tried to sync it but it seems that required unblocking the hub from the internet.

Update: 9/1/2019

They have made turning on XXMP an option the the current firmware releases. Not sure how long this is going to last but the 2 Homeseer plugins both seem to still require XXMP to work. Note when I did this the option is at
Menu > Harmony Setup > Add/Edit Devices & Activities > Hub > Enable XMPP
not
Menu > Harmony Setup > Add/Edit Devices & Activities > Remote & Hub > Enable XMPP

Monday, December 3, 2018

A quick note about POE claims and compatibility

On the camera side the specs can get a bit confused sometimes. For instance I bought some Reolinks I thought were POE from the listing but it seems the WiFi models do not support POE while the exact same models without WiFi do. You need to sort out which POE type it wants. Generally this going to be 802.3af or 802.3at but Unifi for instance has some stuff that only support 24 volt passive. And some others have they own ways of doing things so read carefully. And of course if the camera does not support POE directly but is powered by 12 volts you can always use the Huacam HCP05 Passive PoE Injector/Splitter with 5.5 x 2.1 mm Connectors. With good cables I've managed up to 200 feet with them.

You need to make sure the POE injector and the camera are the same type. The PoE Detector for IEEE 802.3 or Passive PoE - Quickly identify Power over Ethernet; Display Indicates Passive or 802.3af/at; 24v, 48v, or 56v; and Mode B Reverse Polarity is a nice cheap tester to see what is coming out of your switch. Note it sees 12 volt passive as 24 volt. Though I'm thinking something a bit more might be a good idea.

For instance I found this switch on sale. The PoE Detector for IEEE 802.3 or Passive PoE - Quickly identify Power over Ethernet; Display Indicates Passive or 802.3af/at; 24v, 48v, or 56v; and Mode B Reverse Polarity shows it is putting out 802.3at while my trusty WS-PoE-Tester - Inline Tester For Power Over Ethernet | Display 20 to 56 Volts, 0-5 Amps And Display Actively Used Power 802.3af/at and Passive PoE at 10/100/1000 Data Rates says it is outputting nothing without a matching POE camera on the other end. They have a newer version called Inline Power over Ethernet Voltage and Current Tester (PoE-Tester-Gen2) which does both. Though I'm also looking at the Triplett / Byte Brothers POE1000IL Inline POE Analyzer which seems to do a bit more.


Monday, November 26, 2018

Option C: ethernet over power lines

Original post 11/26/2018:
Been awhile since I tried one of these (and was very disappointed back then) but given the fun keeping cams down at the creek has been I thought I'd try it again. I bought one of the TP-Link AV1300 / AC1350 Gigabit Powerline Wi-Fi Adapter Kit | HomePlug AV2 Technology w/Beamforming | Plug, Pair, and Play (TL-WPA8630 KIT V2) because it had 3 ports plus WiFi AP built in. I should mention this is in a heavily wooded area outside my fenced in area. The cams are also close to the creek and I've had a couple cams near the creek stolen and wires cut. I was getting OK reliability  with a serious outdoor AP. A Unifi Outdoor+ with Ubiquiti Airmax Omni AMO-2G10 10Dbi 2.4 GHz Rocket Kit which could cover an acre without all the trees. I also tried putting an Unifi Outdoor+ down in the trees but since it was mounted in a tree the connection was flaky plus I was not happy with the idea vandals could get to a cable wired directly into my network and could fry some hardware. With the power line option they might destroy equipment outside the fence but not inside. So far it is working great which is kind of surprising on a couple levels. First from my previous disappointing experience. Then there is the whole AC noise issue that made me move from X10 to Z-wave a few years back. And I did not make it easy. The connections goes from the switch, to the inside adapter, to a 75 foot extension cord with neon power indicators in it (it was in place already), to and outside plug, through a Z-wave power switch, down a line about 55 feet to a breaker box, down another line to and outdoor outlet about 60 feet from the breaker and then lastly another 50 foot extension cord to a waterproof box where the receiver and POE injectors are. Despite that AP being in a box on the ground the WiFi seems to work pretty good too. This comes in real handy for adjusting the cams out there where getting between the tablet and the AP can be enough to lose a large percent of frames if not the connection.

Note I had bought a couple CelerCable CAT7 Slim Flat Ethernet Patch Cable with Snagless RJ45 Connectors, 50 Feet - Black with the thought they might be harder to see laying flat against the trucks of the trees but be warned these cables got hot running 12 volt POE through them. Using the Huacam HCP05 Passive PoE Injector/Splitters of course. The resistance in the cable was so bad the Amcrest IP4M-1026 would drop offline when the IR LEDs kicked on. I ended up routing the power through the old power cables till I receive replacement cables.

Update 7/25/2019:

The install down by the creek has been working well so I started thinking of doing similar out by the gate. This involved running about 300 feet of armored 120 VAC cable through the trees from the house breaker box and putting the home end on a different circuit, though on the same phase on the main. This would seem to be well beyond the specs but it appears to be working fine at an average of 230 kB/s. Note the price might be a bit daunting though. By the time you add in the cable, breaker, connectors, GFI outlet, boxes and such it came out to almost a $1/foot. With the Ethernet of Power being the first $100 of that. But it is handling 30fps of 720p just fine across the built in WiFi which is much better than the 1-3 I was getting before and should let me upgrade to cams with better data rates without worrying about how well their WiFi is.

So far the only downside seems to be that I'm not getting traffic status in the network monitor anymore since a Unifi port or AP is not the first contact point for the clients. Though I can get the traffic stats on the Unifi port the home end to plugged into.

Next I want to swap out that old Foscam FI9804P 720P Outdoor HD Wireless IP Camera with a Wyze cam with sensor hub in an outdoor case. And probably another wide angle cam to watch the street. I'll have to see how it handles the load.
The Wyze cam was a bust.
Ended up with a Reolink 5MP centered on the mailbox so I can zoom in on if needed.

Update: 1/20/2020 some gotchas.
I bought a third unit to use as a spare and had the bright idea of naming them so I more easily tell which was which. This seems to not do anything but cause the units to unpair.
TP-link device setting screen.
Also I plugged a Etekcity smart plug into the outlet that joined the 250 foot run from the gate to the 50 foot run to the house so I could control some low voltage lighting I added. This totally messed with the signal reducing it to the point I was averaging 1318 ms pings. Adding a surge protector between the line and the plug seems to have brought things back to the normal average for that line of 155 ms ping times. Note the original run to the creek area is averaging 7 ms pings.

Update 1/31/2020: The ping times started getting bad again. The issue appears to have been the Stanley power strip I plugged the indoor end into was causing noise on the line. Moving the indoor end back to the wall outlet got the ping times back to averaging under 70 ms. 

Friday, November 16, 2018

Added filterable sheet to camera compare

On my Camera spec compare sheet I added a transposed version of the HD cams sheet called HD filterable. It is not as readable as the other given it is over 200 columns by almost 30 rows but it had the advantage of being able to filter the camera models by all the features you are interested in. Just go to the HD filterable sheet and create a temporary filter

Then click on the down arrow of each column you want to filter.
For instance here I selected Brand, Color and Viewing Angle such as
To get a view like this

Monday, November 5, 2018

What is the best camera for X?

I see that question posted a lot. Often just "What is the best camera?".

Answer

It really depends on what you are monitoring and the features you need to do that. If you are just looking for a motion alert about anything will do. Note outdoors that will likely include things waving in the breeze or reducing the sensitivity and or marking to the point you miss a lot. But if you actually want to be able to have video usable by the police or (even more usual in my case) see what caused some damage and find how it got there to do it or where some critter is hiding, you need to have the right equipment in place before it happens. And that takes some thought. Preferable leaning to the overkill side given lenses get dirty and odds are you will not think of everything that will happen that you will want footage of after it does.

Once you start looking you find WAY too many posts and even news reports where someone only discovers the video they have is basically worthless after something has happened. Then as mentioned at the start I see almost daily posts just in one Facebook group alone, much less other groups from people asking which camera or even camera / NVR bundle is best with little of no mention of what they are trying to monitor. There seems to be a common myth that there is a best best cam that is also best in every situation. Better it do a bit of planning up front for the best match to your situation and get the footage you want latter. Even then you will probably want to add or upgrade cams once you see what you get. Especially the way prices are dropping per megapixel.

Think of it like buying TV(s). If you are cool with watching TV on a phone then the stream quality does not matter much. If instead you are coming from a 25 inch analog TV to a 40 inch 720p looks awesome but a get you see 1080p you will never go back. Though 4K is probably overkill till you are ready for a larger screen as well. But for TVs HDR (kind of analogous to color low light sensitivity in cams) is probably more significant to most than 4K. Though to get HDR you generally need to buy a higher end 4K TV.

Things to take into account:

If you are looking for some examples of what actual footage from several models of cameras look like check out my playlist of security camera examples.

Use the above to figure out the minimum specs you need to get usable video.

This why I currently have online are a mixture of brands and models. See my compare sheet.

To find the best camera(s) you need first by gathering the answers to most of the above then ask that question again and or do a bit of research.

Again plan on wanting more once you know what you have been missing you can easily want to cover every inch. I started with a tower cam on a rotor so I could see what the dogs were barking at without having to go to the right window or maybe even outside to see. Even with all my cams I  still have spots I want to add cams.

This whole blog is me documenting what I learned from what I've tried, what worked and what didn't despite of or confirming other's claims. And hoping to spare others some of the pain.

Adding this which should be pinned to the top of every security cams group.

FIRST figure out the specs you need for each camera location THEN start looking at models. You might be OK with Wyze cams or need $10K worth of gear to do what you want. The important part of that is what YOU want. I currently have 61 cams online and I'm still adding and doing upgrades but that is me. I'm covering multiple buildings plus acreage and I have critter issues. Some are OK just seeing something is moving on their phone.

The basics for usable footage (not just motion detection):

  • Any bundled system is just a starting point to learn on. 
  • Read NVR specs with skepticism.  For example supports 16 cams might mean only recording on motion or recording 24/7 but with not motion detection or 16 lower rez cams than the ones it is bundled with comes with much less the max rez it says it supports.
  • Any cam looks OK on a phone. The question is can you see the level of detail you want to see at the distance you want to see it by zooming in after the fact (assuming you are not monitoring your PTZ cams 24/7).
  • Avoid analog, battery power and WiFi cams and recording only to the cloud where you can.
  • Record 24/7 somewhere. This means no battery powered cams.
  • 4K will not let you see farther. it is for getting more detail in the designed range. 
  • An unmonitored PTZ cam can not reliably cover the same area multiple fixed cams can.
  • Any cam that is not auto focus has a fixed range where objects are in focus. This is called depth of field. This range can be large or small depending on the camera design. Google it for more info. 
  • Sample night vision shots mean little without knowing what external lighting might be affecting the result. Compare shots between cams taken at the same time of obviously the same view are the best.
  • Put your cams and NVR on a UPS.
  • Most of the people posting in groups only know the one thing they bought often with little or no research other than asking a vague question in a Facebook group. I would not call myself an expert even with all the stuff I've tried. This analogy an installer told me sums it up perfectly. "I have to explain to my clients that if you have only ever ridden a horse and someone gives you a small compact car, you are gonna think it's awesome purely because you don't know you can get a Range Rover or a Truck for the same money." Then there are the ones trying to sell you what they sell. They might not even be pros. You definitely need to take the source into account and factor in bias and scope of experience.

Thursday, October 11, 2018

Rexing V1P vs V1 3rd gen Dash cam

Rexing V1 3rd Generation 4K UHD WiFi Car Dash Cam 2.4" LCD 170° Wide Angle Dashboard Camera Recorder with WiFi, 16GB Card, G-Sensor, WDR, Loop Recording
with
Rexing GPS Logger for Rexing V1 3rd Gen, V1P 3rd Gen, V2
and
Rexing V1P 2.4" LCD FHD 1080p 170 Degree Wide Angle Dual Channel Dashboard Camera Recorder Car Dash Cam with Rear Camera, G-Sensor, WDR, Loop Recording
with
Rexing GPS Logger for V1 and V1P

Overall I'm quite pleased with the result over my previous dashcam, a VC-250 Dash Cam with GPS. Though I miss the remote on the VC-250 to trigger protecting of videos from being overwritten. Finding and pushing a button on the camera while driving is not practical. That experience taught me too an interior cam is about worthless for seeing out the back. Which is why I mounted a Rexing V1 3rd Generation 4K camera facing front and a Rexing V1P mounted on the rear window with its remote cam inside pointed forward to catch an inside and bit of side view that might be needed. The over all effect is almost a 360 exterior view plus interior. Decent audio on all streams makes syncing the stream almost automatic in a editor like Adobe Premiere Pro.

Here is a quick multicam video I made from my Rexing V1P rear mounted camera and my forward mounted Rexing V1 3rd Generation 4K. Elements from the each cam are overlaid to keep the SUV in view and the GPS speed and time readings. It is an example of the clarity of the cameras and how they can show evidence if you need it.


For example in the above thumbnail I mixed the video down to the 1080p rez of the Rexing V1P forward (my back view) stream, overlayed the interior view from the Rexing V1P's remote cam and  overlaid a zoomed in image from the Rexing V1 3rd gen to show the lights and a cropped but dull rez shot of the Rexing V1 3rd gen's data overlay at the bottom to show speed and time. Lastly I added text. With something like Adobe's Premiere Pro it is not all the hard but not so easy you would normally do without reason.  I did a post digital zoom on the 4K stream to highlight what was happening. Note the 2X, 3X and 4X flash in the lower right to indicate that it has reached that level of zoom. (The editor smooths the changes in zoom so you might not even notice them.)  The picture near the end is still pretty clear at 4X zoom. Better than a lot of 720p cams I've seen unzoomed.

Note the raw video has GPS data encoded if you have options GPS. If you use the JMS DVR GPS player to view the videos you get a screen like this.

This is one of the improvements over the VC-250 that you had to convert the videos to see them outside of their app and after converting you lost the GPS data.

Note I replaced the audio on these to avoid audio book copyright issues.
Rexing V1 3rd gen night video sample
Rexing V1P exterior night sample
Rexing V1P interior night sample
Playlist of other Rexing videos of mine

Friday, September 28, 2018

Quick overview

At the moment I've have 38 cams from several brands on 3 Blue Iris servers plus one each of the Wyze cams. I've tried almost that many models. Here is what I've found.

I like the clarity of the Reolink 5MP the best.

But I've found the Reolink 5MP bullet cam can have trouble in Texas heat. When temps got over 100 here the Reolink's auto focus and zoom motors stopped working then the camera just crashed. For awhile it was also losing its configuration I bought the dome version and have not had any trouble with it. Heat has not seemed to be an issue with any others except the old Foscam 8900 PTL series OEMs made for indoor use.

IR reflection bad be really bad in some of these. Dome cams almost all seem to have this to some degree. You should look at the pics here but in general I would recommend the Amcrest, Hikvision or Reolink bullet cams for that.

Wifi range varies a LOT. For example at the turn in my driveway some 80 feet through heavy woods the Amcrests, Foscama and Escams all worked most of the time. Reolink, Hikvision and SV3C were iffy and the Wyze cam could not even connect.

Friday, September 7, 2018

Running a camera on battery


What I wanted to achieve.

I wanted to get a cam on my mailbox which across the street. But the closest place to an outlet that could get line of sight is over 300 feet from any building and across the driveway. So we are talking major construction to run a line or POE cable out there. I already have a couple cams down by the creek running longer distances from my super AP ( a UniFi AP Outdoor+ with a Ubiquiti Airmax Omni AMO-2G10 10Dbi 2.4 GHz Rocket antenna) so I started to wonder what kind of battery would it take to power a camera.

Experiment 1

Hooked a Foscam FI9804P 720P Outdoor HD Wireless IP Camera to a 12V 9Ah Compatible Battery normally used in pairs in my UPSs and it ran 35 hours.
Temp UPS battery setup

Experiment 2

Same Foscam FI9804P 720P Outdoor HD Wireless IP Camera but with a Duracell Marine Battery (Group Size 24) and it ran about 6 days. Was not sure it was fully charged since that seemed short so switched it back to the UPS battery which only lasted about a day this time. Running it dead might be taking a toll on it. Put it back on the big battery and up for 6 days so far.


Experiment 3

After talking to a neighbor and looking up some specs I started thinking a Wyze cam v2 might be a better way to go. About 1/2 the power draw, has audio and 1080p instead of 720p. Also smaller and needs less IRs to see so less visible. Of course the downside is it only records to the cloud and SD card right now unless you seriously hack it. Also not sure about its WiFi range but will make a good experiment. I'll first try it in parallel with the Foscam on the big battery and the Wyze on the UPS battery. Since it is an indoor camera I also bought the Frienda Camera Cover for Wyze Cam 1080p HD Camera and iSmart Alarm Spot Camera, Black Skin Cover with Security Wall Mount, Weather Resistant, Against Rain and Dust and some adapters to power USB off a battery. Camera, cover and 25 foot power cord total cost just $46.96. Add another $9.99 for a 32 GB SD card for redundancy sake.

Here is what it looks like with the cover on. It is a rubber like material which should seal it pretty good.
From front

From bottom
Ran into a problem with the power adapter I rigged up from WINOMO Car Auto Battery Terminal Clip 12V DC Cigarette Lighter Socket Adapter and Car Charger RAVPower 24W 4.8A Mini Dual USB Car Adapter with iSmart 2.0 Tech, Compatible with iPhone X 8 7 6 Plus and Galaxy S9 S8 Plus S7 S6 Edge Note 8 - Black seems the RAVPower is not long enough to make contact in the WINOMO. Ordered a Anker 24W Dual USB Car Charger, PowerDrive 2 for iPhone X / 8/7 / 6s / 6 / Plus, iPad Pro/Air 2 / Mini, Note 5/4, LG, Nexus, HTC that will hopefully work better.
 This appears to be a failure because the Wyze cam will not connect even at the driveway curve about 80 feet from the AP with line of sight much less through the woods where the drive cameras are or out by the gate where it was supposed to replace the Foscam.


Update 7/25/2019:

After almost a year of swapping out the RV battery twice a week, they seem to last 5-6 days, I finally decide to run AC out there to the gate. Very happy with the result though a bit pricey. See Option C: ethernet over power lines for details.

Wednesday, July 4, 2018

Wyze Cam Pan 1080p Pan/Tilt/Zoom Camera and V2

Wyze Cam Pan 1080p Pan/Tilt/Zoom Wi-Fi Indoor Smart Home Camera with Night Vision and 2-Way Audio

Setup was easy.


The password would be filled in above but see below.


No the QR code will not work even on my network since the password was blanked.


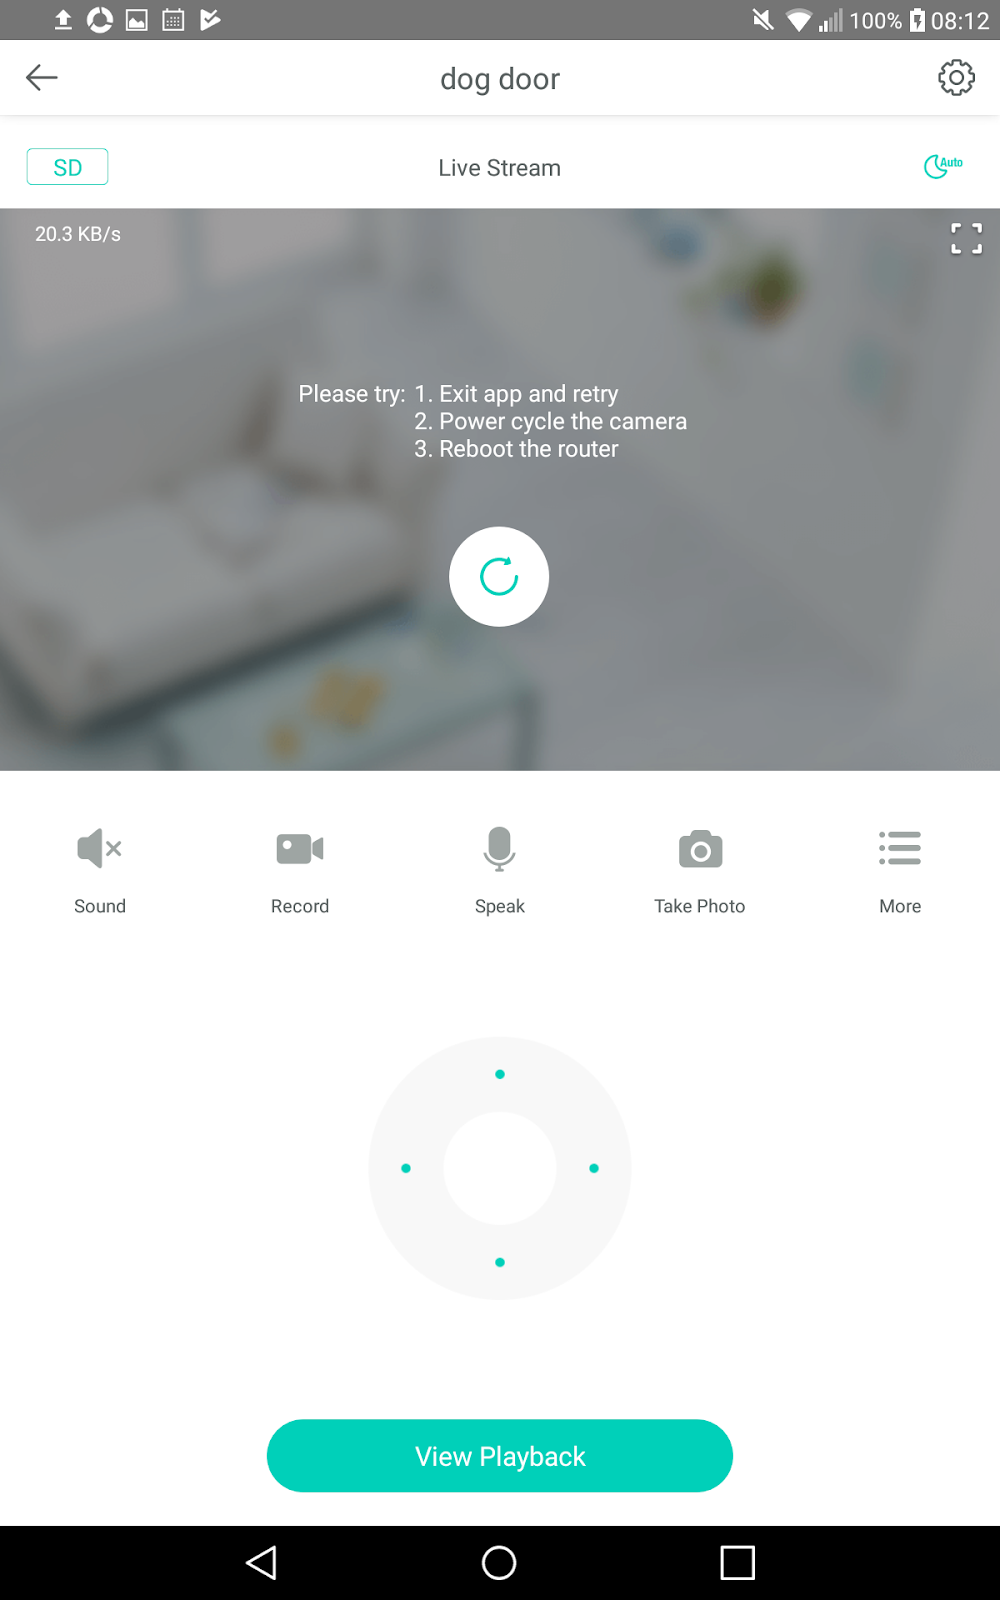
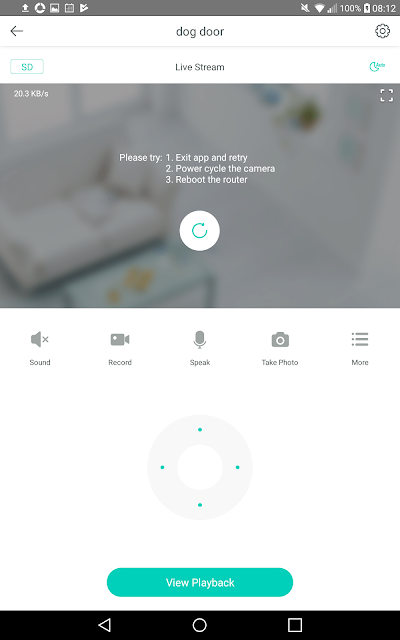
However when I went to check the video a week later for some samples to post and it had quit recording after a day. The camera was still tracking movement just not recording to the cloud. I had not put an SD in yet so there was nothing to check there. So I deleted the camera from the app, reset the cam and did a readd. But it would not connect. I wasted hours trying stuff. Finally I tried setting up a wide open Access Point (AP) and noticed the password was still filled in. I removed it and it connected. Repowered and it still reconnected so I wiped it all and readded to the secured guest network and it still works. While I was at it I stuck a 32 GB SD in it.


So far it looks like it is running just under 1 Mbps bandwidth. Their specs recommend 1.5


So far the main drawbacks are:


  • Only records to SD or the cloud
  • Only saves triggered video. No 24/7
  • You can only view video from the phone app (no web viewing).
  • No easy way to change WiFi password.
  • Some suspicious network activity has been reported so only use on a guest or other isolated network.
  • The above also probably means you should think twice about putting the app on and phone or tablet that has sensitive info on it.


Pluses:


  • Free 7 days of cloud recording.
  • Ridiculously cheap at just $38 including shipping.
  • Seems to do an OK  job of tracking (by doing pan and tilt) and marking moving object in the video. (See videos below.) Note people have reported being creeped out by this and have to admit it does feel a bit weird and makes the camera seem a bit alive. I was actually surprised how little video was saved vs the amount of time the cam appears to be panning to look at things.
  • Can save / send video to a huge number of services
  • Alexa support just added.


I posted some sample videos on YouTube with the motion and sound detection at the default values and motion detection masked to around the dog door. Unfortunately I can not really show you the mask because when you go back in to modify the mask it only shows till the video kicks in and then defaults back to the whole screen.


Basically it is top to bottom from the wall socket to the edge of the window.


Main things to note here are how random the video is. It was triggered by noise way more than motion.


Lastly connecting the cam is slow and fails fair amount. Being an encrypted guest network might be a factor in that though as mentioned above I would definitely suggest isolating from your network like that.


Since the cam does not record 24/7, if this was my only cam in there I would be thinking of taking off the mask and cranking the sensitivity. Though that would probably make finding video of actual motion harder to find. As is I already have 2 cameras recording 24/7 in there to me it is mainly another motion detector and hopefully gets a close up of who is using the door should I need to know. If they made an outdoor version of this I'd definitely have a spot for it and would probably recommend at double the price. Would think about a couple for the barn if I could monitor on a local PC since most of my cams are to let me see what is going on (as in what has the dogs upset) with as little distraction / time wasted as possible. Having to open an app, connect to a cam and find a notification just does not do that. To notify you with a video if something is moving where there should be no motion it is not bad. Especially for the price.


Update: 8/11/2018 More issues.


Found these instructions online for using Tiny cam to bridge the cam to the local NVR. They did not work for me. Might be some sort of manual firewall config though. Note they seem to connect to the server not the cam directly so you might be burning as much down bandwidth as up using them. When you test your connection it says it is receiving something but dropping all frames even if you point it at an address that does not respond which is either misleading or something else is going on.


However, trying to debug first I checked the regular app and it could not connect either till I rebooted the cam. Even after rebooting the cam it kept dropping out. So that might be an issue too. Oddly there are plenty of recordings which would seem to indicate the stream is getting to the cloud.


On a whim I tried connecting with the Amazon Show. But it now seems to think my one cam is two cams with the same name and will not connect to I rename one.


Update 11/22/2018: Got Tinycam to link to Blue Iris


Note I started with Pro version this time. Not sure if that was a factor in it working this time. 


Note when selecting Wyze and the cam type cloud is the only protocol available despite what the pics in the instructions sem to show. Then in Blue Iris setup your video config like this

Blue Iris video config window

The host and port come from the Tinycam app as mentioned in the instructions. Note the capital I in cameraId. 

The value can be found be pulling up the live view of the camera in a browser. The first screen you see when you point your browser to the Tinycam web server is the status / maint screen.

Tinycam status and maintenance page


Click on the All Cameras button and you get something like this.
Tinycam view all cameras page
Click the fullscreen icon
Full screen button pic
on one of the cameras and the cameraId for it is the end of the URL (Highlighted with yellow rectangle in pic.)

Tinycam single camera view page


This should get you connected however for for me:

  • The first cam, the pan version, connected fine but second, a V2, was iffy getting to show in the phone interface, web interface and never did connect to Blue Iris while I was sorting all this. I did move the V2 closer to the AP though and it started working so it might be a WiFi issue. Especially then coupled with its failure to connect in the driveway.
  • The Samsung Note 4 I was running Tinycam Pro on got hot and the drain on the battery even with the display turned off was high enough the battery ran out after s few hours. After recharging the phone, only running the Tinycam app, removing it from the case and placing it across a pyrex bowl to maximize air flow I got it to run overnight without overheating or the battery going dead.
  • Lastly it appears Tinycam is pulling from the cloud service which means you will be buring double the external bandwidth that would only be local with a camera with ONVIF or RSTP support.
Update 1/17/2019: After shutting down about everything else on the phone (does not even have sim) and only connecting to one Wyze camera. I noticed Tinycam was offline and when I checked it this is what the phone looked like. Probably lucky it did not burst into flame.
I put in a new battery and placed a temperature monitor with alarm on it. So far it seems OK but keeping a close eye on it. Here is a chart of the temp of the phone vs the room it is in.


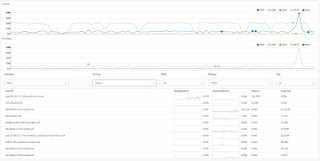
In the load chart below it appears there is an upload of around 7-9 Mbps from the 2 cams. There is of course other stuff going on which spikes the upload to 20 Mbps or more and the download  is an almost constant 40 Mbps. But again in the dips is a matching 7-9 Mbps load.
OPNsense traffic report page

Here is a shot of the Tinycam stats screen the second day showing a bit on improvement over the day before.
Tinycam status info

After a couple days of up and downs I can't say I recommend Tinycam as a bridge or a constant view solution. Though at least some of the problems are probably Wyze related. I had both cams working for awhile the cameras seemed to take turns being offline. I tired installing on Bluestacks which seemed to have similar viewing issues and as far as I can see, no way to make the web server part of Tinycam accessible outside of Bluestacks. I also tried it on my new LG G Pad 2 a lot more powerful than the Note 4. Unfortunately the best I could do was get one camera to connect. I should note here too even the Wyze app was having issues talking to the cams despite signal levels of up to -26 db (99%). In fact I saw more issues with the cam with the stronger signal.


The last thing to try is OpenIPC Firmware for Wyze Cameras 

It is basically rooting the camera to convert it to a simple WiFi camera. It is open source and appears to be a simple SD card install. 

Note "Set up Wifi in the SD card config folder wpa_supplicant.conf" in the instructions means rename wpa_supplicant.conf.dist to wpa_supplicant.conf then edit it to change SSID and such to match your WiFi network.

ctrl_interface=/var/run/wpa_supplicant
ctrl_interface_group=0
ap_scan=1

network={
        ssid="SSID"
        # Uncomment to connect to Hidden SSIDs
        #scan_ssid=1 
        key_mgmt=WPA-PSK
        pairwise=CCMP TKIP
        group=CCMP TKIP WEP104 WEP40
        psk="PW"
        priority=2

}

However once I did this the camera would no longer connect to WiFi. Seems this is a known issue.   After some research on Raspberry Pi blogs I found some dos that said priority=2 is only if you have more than one WiFi you use. removing it seems to have solved it.

I also discovered the demo.bin file is a boot loader altered to look at the SD so you really only have to mess with the holding the button bit the one time. I should also note the OpenIPC version has all the logging stripped out of run.sh so when things go wrong it is impossible to know what happened. So added some back similar to what was in the Dafang hacks and a couple things of my own in mine to help sort things.

CONFIGPATH=/system/sdcard/config
LOGDIR="/system/sdcard/log"
LOGPATH="$LOGDIR/startup.log"
if [ ! -d $LOGDIR ]; then
  mkdir -p $LOGDIR
fi
echo "==================================================" >> $LOGPATH
echo "Starting OpenIPC" >> $LOGPATH
echo "==================================================" >> $LOGPATH

## Update hostname:
hostname -F $CONFIGPATH/hostname.conf

## Load kernel modules
insmod /driver/tx-isp.ko isp_clk=100000000
##insmod /driver/sensor_imx323.ko
insmod /driver/sensor_jxf22.ko
##insmod /driver/sensor_ps5230.ko
insmod /driver/exfat.ko
insmod /driver/sample_motor.ko
insmod /driver/audio.ko spk_gpio=-1 sign_mode=0
insmod /driver/sinfo.ko
##insmod /driver/8189es.ko
insmod /driver/sample_pwm_core.ko
insmod /driver/sample_pwm_hal.ko
insmod /driver/rtl8189ftv.ko
##insmod /system/sdcard/driver/sensor_jxf22.ko data_interface=2 pwdn_gpio=-1 res                                                                    et_gpio=18 sensor_gpio_func=0

## Fix IR:
echo 63 > /sys/class/gpio/export
echo out > "/sys/class/gpio/gpio25/direction"
echo out > /sys/class/gpio/gpio63/direction
echo 1 > /sys/class/gpio/gpio63/value


## Start Wifi:
echo Start Wifi: >> $LOGPATH
wpa_supplicant -D nl80211 -iwlan0 -c $CONFIGPATH/wpa_supplicant.conf -B &
sleep 5
wpa_supplicant_status="$(wpa_cli status)"
echo "wpa_supplicant: $wpa_supplicant_status" >> $LOGPATH

#udhcpc -i wlan0 -s /system/etc/udhcpc.script -q
udhcpc -i wlan0 -p /var/run/udhcpc.pid -b -x hostname:"$(hostname)"  >> $LOGPATH 2>&1

## NTP Server
echo Start ntpd: >> $LOGPATH
ntp_srv="$(cat "$CONFIGPATH/ntp_srv.conf")"
/system/sdcard/bin/busybox ntpd -q -n -p "$ntp_srv" # run ntp update  >> $LOGPATH 2>&1

## Start FTP & SSH
echo Start FTP-SSH: >> $LOGPATH
/system/sdcard/bin/dropbearmulti dropbear -R  >> $LOGPATH 2>&1
/system/sdcard/bin/bftpd -d  >> $LOGPATH 2>&1

## Start Webserver:
echo Start Webserver: >> $LOGPATH
/system/sdcard/bin/boa -c /system/sdcard/config/  >> $LOGPATH 2>&1

## Autostart
for i in /system/sdcard/config/autostart/*; do
echo Start $i: >> $LOGPATH
  $i  >> $LOGPATH 2>&1

done

On the plus side if all else fails just powering it up without the SD card seems to set it back to where it was when first set it up with your config intact.

Working with Blue Iris

If you got the OpenIPC working OK then to get Blue Iris to use it you need a video config like this


The password is ismart12
Note you need to type in the Video Path and change the RTSP port.
I have not fully tested it yet but it seems like many of the controls do not actually work and or go back to defaults after reboots.
Other I've noticed so far
Time seems to ignore timezone and shows UTC
The video stream seems to be 720p no matter what the value Manage->Setting->Resolution are set to.
Manage->Setting->Display debug info on OSD look useful
Bumping the cam seems to be too much motion for it to deal with,

CPU is really cranking and the cams seems to be running hotter than it did before the new firmware.
Motion detection does not seem to actually doing anything till you configure it and then only puts a dot in the upper right corner

It is hard to say how much CPU motion detection is using but given I've seen it hit 100% it does not seem to be worth the overhead.

Lastly night vision does not seem to be working right. Setting Manage->Setting->RTSP->Night Vision to On seems to flip it into night vision mode for a second then it flips back even when it is too dark to see anything unless you turn off IR Cut first. There might a set of clicks that get this working but this would seem to indicate it is not planned to be fixed.
So with the IR Cut on my hall at night with just the light from the bath room looks like this from the Wyze V2.
For comparison here to the view from the kennel looking back the other way.
If I turn off the IR Cut you can see a lot more
Which really is not that bad other than the tint. If I turn the lights on in the hall it is not enough to mask the tint though it should be bright enough in the daytime.
Was about to give up on this for the night when I went though the process one last time and this time there was no tint. This it the options I ended up with.
And here is the working night shot.

Update 4/29/2019 Wyze adds RTSP support.
Tried it on my Pan and was as easy as and similar to the OpenIPC SD card style upgrade though with less needed config.  Details here. So far seems like everything else looks the same. Given how hard OpenIPC drives the V2 I figured something would have to go. If the cam does not fry from the load I'll be impressed. By the next morning the case was still cooler than the V2 running OpenIPC. I did notice bumping the cam when I felt the case seemed to freak out the tracking for a bit causing the cam to bounce back and forth for a while. Had to stick my hand in front of it to give it a simple view to calm it down.

Update 5/18/2019 Wyze RTSP definately better than the OpenIPC firmware.
Bottom line, I bought another V2 to try this on after the Pan and was impressed enough to get another and convert the V2 I had OpenIPC on to the Wyze RTSP firmware.

Caveats:


On the plus side.

  • Both the V2 and Pan are supported where OpenIPC sort of does.
  • The camera runs somewhat cooler
  • I'm not seeing the pixel distortions (see above) anymore. 
  • You retain all the Wyze features including the output resolution, working day/night switch and rectangles around motion.

Reliability of the stream seems unchanged. I've gone to just putting them on Etekcity plugs and having my home automation system repower them if they are offline for more than a few minutes to workaround that. Still all and all it tough to beat for $25 and $38. Especially when you get 3 way storage. On the SD card, 24/7 stream to NVR and alerts to the cloud. That should insure you always know what happened.