Showing posts with label Tools. Show all posts

Tuesday, May 5, 2020

Getting cam specs the easy way.

Goto IPVM

  • Find your house
  • stick a virtual cam on it
  • Move the person icon to the middle of where you want focus
  • pull in the sides of the triangle
  • see what it says Distance and HFoV
  • You can then play with resolutions to get a basic idea of the detail you would see if a person was standing at that location.
  • You now have the spec you need for that cam.
  • Repeat till you have everything you want covered, covered.


What you end up looks something like this (totally random house in Australia)

Now granted you will probably need to round those to standard value or plan on getting zoomables to get the view angles you want. 

Note too if a cam just says view angle instead of horizontal view angle it probably means diagonal which is a bit larger.

Friday, September 6, 2019

Quick note on recovering video files from a corrupted SD card

What happened

Originally written Oct 17 2018:
If you are like most you probably move files from a SD card to a hard disk for processing instead of copying first and then deleting. Generally that saves time but then ever so often something happens like it did to me last weekend when between files one and two I received the error the SD could not be read. Seems the delete of the first file took out the partition somehow. It is still unclear if it was a SD card issue or a glitch on the PC / card reader side. Though I'm leaning toward the card. On principal (gut feelings) if nothing else.

What did not work

My first thought was to run SpinRite on it to try and sort any dead sectors but in this case SpinRite just hung discovering devices. I first assumed this was the corrupted partition causing an issue but even after formatting the SD card, SpinRite still hung discovering devices. Further research points to this being a known issue with some USB devices.

A little Googling will tell you the best way to sort this is to run PhotoRec which will scan the card and reconstruct the files for you. Note the source is on Github but get from the CGSecurity site. But this seems not to actually work or at least not for me. (What did comes later.) I was trying to retrieve files from a Canon G30 camera in this case which might have made a diff but I doubt it. It records in the usual 4 GB mp4 format files mike a lot of cameras do.

I tired various combos of file types to scan for but the best I could get was a mix of mp4s and movs, none of which were playable.  Then I found a post that said there was more info in the TestDisk Documentation.  (PhotoRec is part of the TestDisk package.) On page 45 it says to

type file2_ftyp.mov file1_mdat.mov > test.mov

But I did not have any _ftyp.mov files in my recovered files. I tried using some mp4 and _mdat.mov files that looked like they should match but no luck. Note this insanely slow. After I was able to recover the files I revisited this to try and reverse engineer. After having it recover anything looking like a file (default file type options) I looked for what might match one of the short files that was 3,833,076,414 bytes. 


The nearest matching mov files were 3,731,881,984 a diff of 101,194,430 bytes and 3,832,158,910 bytes a diff of 917,504 bytes. The mp4 files created by the tool are 917,504 bytes. So the second one seems right but does not play and thinks it is the same 16 minutes long as the recovered mp4. This got me thinking digging deeper into the properties of those mp4. None of them matched the run time or data rate of the recovered file. A couple had no info though.


So then I thought what about taking the mov file size, add 917,504 and then find the matching sized recovered file. But that did not work either because adding that to any of the full sized movs makes them larger than the mp4s they should become. Finally I made a sheet to cross ref all the data to make one last try of getting at least one of the recovered from the pieces in case I need to some day. That seems to say this should work
type f24968960.mp4 f73957376_mdat.mov > 3.mp4
And it seems to!  So basically if you end up going this way what you need to do is try all 12  mp4 with each of 14 mov files. That is 168 combos. You might be able to cut that down a bit with some guessing. Here one of the movs was obviously too small and I was able to guess at a couple by looking at mp4 run times vs mov sizes. (See the sheet.) Then by trying all possible combos I was able to get 4 more. If you have the space (about 750 GB to recover this 43 GB of files) and can run while doing something else, like sleeping, your quickest option is to create a matrix like I did in the sheet, copy those commands to a bat file and let it run. Then once it is done you can quickly try and open each one to see if it works.

Bottom line though I was still only able to recover 8 of the 12 files which is not very good. Note too I did "find everything" runs on Linux and Windows and got diff results! (See sheet.) The run using the Windows GUI recovered 2 each less mov and mp4 files. 2 of which matched up in the Linux run.

Note the instructions tell you to upload a file to their site if you can't get it to recover your files correctly and it will try and give you hints to tweak the scan. Problem is the max is 10 MB which in this case is less than 2 seconds of video. Not encouraging plus meant I needed to record something short onto another card to even have a sample. I tried it anyway with an 6.53 MB (< 1 second) file and it said was still too large.

Trying to rebuild partition instead

After I gave up on recovering the files the first time I started thinking maybe I could recreate the partition and maybe I could then recover the files with some other tools. Starting on page 31 of the TestDisk Documentation it gives you some basic instructions. At first I cloned the SD card to an image file and tried options to recreate the partition which did not seem to work. Then I noticed I could list the files and things fell into place. Here are the steps that worked for me.

Select the image or disk to work on Note can give file or device path on the command line as I did here in which case only that one will show.

You probably want to select Intel here. If the partition is toast it come up with None highlighted.

Select Analyse


Which gets you this screen but in this case is unhelpful so select Quick Search

Now it gives you its best guess at what the partition was. Note the type names seem a bit fluid. Just try what it gives you first. Type P, if you do not get a list of files on the next screen backup and use T on this screen to try something else.

You should now see the top folder on the card. Select your way down the tree till you get to the files you want.

Type h to hide old deleted files if they are not ones you want.

Select each file by typing : (the colon key) on while it is highlighted

Once you have all the ones in this folder you want selected type C. Note that is a capital C. Else where case does not matter but on this screen it does.

Select your way to the folder you want the files to be copied to on your hard drive and type C. Note the path of the file on the SD will be recreated under this folder. For instance with the above, I select E:\out so the files will end up in E:\out\ DCIM\124_1005.


Unless you want files from other folders on this SD, that is it. Just Cntrl-C to exit or Q your way back through all the menus.

Update:9/6/2019
Noticing this never was published. Cleaned up a bit and doing so now though obviously almost a year later if some bit it missing I would not know. Will update if needed.


Sunday, August 11, 2019

Doing the math on pixels per inch at a distance for your cam

If you think zoom and enhance is a real thing I have some bad news for you. You can guestimate a pixel that might come between two but that is not really adding detail. It is just making it bigger. Even with some sort of fancy AI like in No Way Out it is just going to convert the image to something like you expect to see. Like seeing faces in the clouds. Just think about it and it should be obvious, pixels can not magically resolve into something the camera did not see. The best you can do is monkey with contrast and brightness and maybe a bit motion fix if you are luck. So you need a minimum of in focus pixels snapped at a high enough shutter to reduce motion blur with enough light and or sensitivity to have the contrast to work with.

Yet I'm still seeing a lot of posts where people are talking up static focus 1080p cams with wide angle for outdoors. Let's do the math on that. There is a simple calculator online to get the width of the area being viewed by a cam with a given view angle. For example let's take my old work horse the Foscam 9800 series that is 720p and 70 deg view angle.

So at 20 feet the view width is 24.4 feet or 293 inches. 720p resolution is actually 1,280 pixels so when we divide the pixels by the view width you get  4.3686 pixels per inch. So a face, about 6 inches wide will be 26 pixels across at 20 feet with this cam. 40 is considered to be the min. So even with the best lens focused for 20 feet this is still not going to cut it.

For convenience I worked up the charts below from my compare sheet. Note these charts assume the camera is focused for the target distance and not the upscaled resolution some cams advertise. Despite claims, outdoor fixed focus cams seem to be focused at around 20 to 30 feet. You might get a "decent 2X screen grab" of targets within +- 10 feet of that. Of course for a large range of  depth you really should look at a camera with auto focus like the Reolink RLC-411WS I've tried. Though it has had the occasional glitch as well. For long distance something adjustable like the Microseven 6-22mm 3MP Manual Zoom Varifocal Len HD 1080P. Or to get an idea of what you might be able to see with a certain model in your location try IPVM calculator which lest you stick a cam on a map of your property to see what the view angle looks like and has simulated day and night shots at the distance you give.


Not those are best case numbers under perfect conditions. While 7 pixels per inch is bare min 14 is the more accepted min. If I change the wanted pixels per inch to 14 the last chart becomes

Note 12 degrees is a fairly extreme telephoto lens in the range of 22mm
70 is standard though up to 90
between 90 and 130 is often called wide angle
180 to 360 are often called 360 view cameras

For a more indepth info look here.

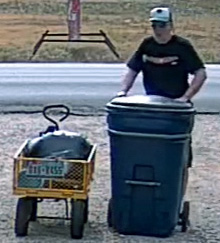
For a visual compare here I am about 33 feet from the cameras.
First an old Foscam FI9804PS 720p and 70 degree view angle

Now compare that with a Reolink RLC-511-5MP with auto focus but zoommed to widest view of about 90 degrees.

We can obviously see a lot more  and it looks clearer. Just for comparison here is the view from a 1080p  M7B77-WPSV1 at max zoom to a view of about 12 degrees located about 190 feet way.

The main diff appears to be the angle .

Now crop the images down to just me and the cart and make them the same size for a recognition compare. Note the sizing is done by the browser. You might interpret a bit more with a smart resize.

The Foscam image cropped
The Reolink image cropped

Lastly the Microseven image cropped.
So a 1080p cam with a 12 degree angle and focused for distance yet almost 6 times the distance away would be better for pulling a plate at the gate than the 720p with 70 degree view. Obviously the 5MP at the gate wins though probably by not as much as you would have thought. I should note here too the Foscam was only doing about 1 fps till I ran power out there so I hook up and access point via Ethernet Over Power. I did that so I could stick a Wyzecam V2 out there but that was a bust. Given its 110 degree view you get a shot like this.

First here is the Foscam from the Wyze compare test. I'm a bit further out in this one about 60 feet from the cams. You can see the zoomed Reolink image behind it. Note images were resized to match width of widest image (the Roelink).

Here is the save shot form the Wyzecam V2

And the uncovered Reolink zoomed to its max of 31 degrees horizontal.
Note the glitch in the pic turned out to be a config Blue Iris issue. Inspect sets it to be a generic RTSP and you want to set it as a Reolink.
And lastly a similar shot with the Reolink unzoomed.

In case you are wondering here are some shot with me much closer.
Foscam shot of me at the parcel box
Wyzecam V2 shot of me at the parcel box

One last distance compare back down the drive about 85 feet from the cams. Between the Microseven still zoomed the max.

And an Amcrest 4K IP8M-2496EB with about 112 degree view angle.

For those that think you can just zoom in, here is what you see if you zoom in to match the Microseven.

But there is one more factor to consider, focus. Autofocus can add a lot though when it gets it wrong it can make your cam useless too. Here is a close up shot with the Foscam where I'm just 7 feet away. The cart maybe double that.
Note the plate looks good but the logo on my cap is blurry. I'm too close for the range this cam is set too.
Here is the same shot from the Reolink zoomed out to the max.
Notice both my face and the plate are in focus because the camera has adjusted.
The down side, something flying too close to the lens can leave you looking like this.

Friday, November 16, 2018

Added filterable sheet to camera compare

On my Camera spec compare sheet I added a transposed version of the HD cams sheet called HD filterable. It is not as readable as the other given it is over 200 columns by almost 30 rows but it had the advantage of being able to filter the camera models by all the features you are interested in. Just go to the HD filterable sheet and create a temporary filter

Then click on the down arrow of each column you want to filter.
For instance here I selected Brand, Color and Viewing Angle such as
To get a view like this

Thursday, February 1, 2018

Paranoia definitely pays when it comes to recording.

Been seeing a lot of posts lately about only recording on motion. Generally this is either to save disk space or make recording to the somewhat feasible. See Some things to keep in mind if you are thinking of cloud recording your cams. Problem is it comes down to one thing. Do you REALLY think you have all possible scenarios covered? In a conversation I just had, a guy was using several sensors, per camera, to try to catch motion while at the same time filter motion triggered by him. While this might make sense for an alarm to keep triggers to the minimum, there is no practical reason to limit recording this way. Recorded video is generally the thing you go to after the alarm failed to protect you. Or to find out the mess you are looking at in the yard happened that the alarm was not even looking for. Bottom line though the ONLY way you will know for sure everything works like you think is after the fact when you notice something has happened and you go look for video. Kind of like raccoon / mouse proofing that way. If you are only recording on triggers then there might be no video to find. Recording 24/7 there will be video even if everything but the cam and the recorder fails to work as planned.

This brings up a point though. How can you mark the video / trigger alerts based on other sensors? This article covers that question pretty well for Blue Iris. Basically it comes down to this.
Set your alerts to be retriggerable by  checking "Also re-triggers"

Then call the trigger via a URL get in the form of
http://IP_ADDRESS_OF_BI_SERVER:PORT/admin?camera=camera_short_name&trigger&user=XXXXX&pw=XXXXXX

For instance to try from a browser assuming:
Your Blue Iris server is on IP address 10.10.2.46 on port 8076 and you wanted to trigger IPcam62 Note that is that is the short name on your properties screen.


And your login is admin/P@$$w0rd
You would call http://10.10.2.46:8076/admin?camera=IPcam62&trigger&user=admin&pw=P@$$w0rd

You should see a response like
signal=green
profile=-1
lock=0
camera=IPcam62-Garage N
If you see camera=NULL you have mistyped the camera name.

To trigger from Homeseer you would create an event like

To go the other way (trigger Homeseer form Blue Iris) see this post in my automation blog.

Other home automation systems are similar.

It is just that simple to get every motion event marked on your video to make finding the right footage easy. If you find the motion sensor is working well enough, you can even turn off Blue Iris' motion detection the save a good bit on CPU load though I prefer to leave it on just tuned to the insensitive side.


Tuesday, February 14, 2017

Review: WS-PoE-Tester/Detector

WS-PoE-Tester/Detector - Inline tester for power over ethernet, display from 20v to 56 volts, 0-5 amps, and actively used power in 802.3af, 802.3at and passive PoE at 10/100/1000 data rates


If you are hooking up IP cameras you probably are connecting them via POE (Power Over Ethernet). Seriously since you have to get power to it you might as run Ethernet cable to it to avoid WiFi issues and power them off the same UPS. Despite the Amazon title for this device it works good with 12 volt systems too. POE or old school analog power cables. Not only will this show that the camera is getting power but also how many amps it is drawing and the actual voltage. Then you can compare the end of the line voltage to the source to see how much loss there is so you can easily see if there is an iffy connection or too much loss due to the length being too long for the cable type you are using. Always try and keep the loss to less than 0.1 volts.

So useful I bought a second as a backup after I forgot to put the first one back in my tool box once.

If your camera does not support POE directly but has the standard 12 volt connector, you can pick up a Huacam HCP05 Passive PoE Injector/Splitter with 5.5 x 2.1 mm Connector to convert it to POE.

Monday, January 23, 2017

Found a nice tool for figuring out what camera you need with what lens

CCTV Design Lens Calculator is a free tool to show you what lens / resolution combo you need in order to:


  • Monitor and Control - 5%; A figure occupies at least 5% of the screen height and the scene portrayed is not unduly cluttered. From this level of detail an observer should be able to monitor the number, direction and speed of movement of people across a wide area, providing their presence is known to him; i.e. they do not have to be searched for.
  • Detect - 10%; The figure now occupies at least 10% of the available screen height. After an alert an observer would be able to search the display screens and ascertain with a high degree of certainty whether or not a person is present.
  • Observe - 25%; A figure should occupy between 25% and 30% of the screen height. At this scale, some characteristic details of the individual, such as distinctive clothing, can be seen, whilst the view remains sufficiently wide to allow some activity surrounding an incident to be monitored.
  • Recognize - 50%; When the figure occupies at least 50% of screen height viewers can say with a high degree of certainty whether or not an individual shown is the same as someone they have seen before.
  • Identify - 100% With the figure now occupying at least 100% of the screen height, picture quality and detail should be sufficient to enable the identity of an individual to be established beyond reasonable doubt.

Note those percentages are based on the old analog cams of about 400 vertical lines. With this tool you feed it the camera specs (including lens) and it will tell you how close it needs to be to the place you are watching for the level of recognition you need.

For instance if I want to read license plates at my main gate. 
With a 720p Escam QD300 with a stock lens, the camera would need to be 34.6 feet from the gate.
Oddly with a Escam QD900 with its larger 1080p sensor but the same 3.6 mm stock lens, the camera would need to be 32.4 feet from the gate. This is because the larger sensor causes the view to be wider even though the lens is the same.
If I swap out the lens though to a 16 mm, that max camera distance jumps to 144 feet. which works.
Put that 16 mm lens in one of the Hikvision 2K cameras and I should be able to read plates at 185 feet. Which be across the street or back in the trees so that is over kill.

To me the most useful part of this tool is seeing what you get for usable video for instance here is a compare of lenses for one of my cameras

You can also import your floor plan and yard objects into it to find blind spots in your layout and try various placements of cameras for the best coverage before installing any.
See their screenshots here